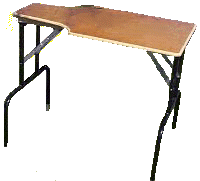
This portable shooters bench design is not completely
original, but I have not seen another like it. It is very stable in field
conditions, compact, simple to set up and not outrageously heavy, usually
17-20lb. No special tools are necessary to assemble it and you can size it to
suit your needs, within certain limitations.
This idea developed when a friend showed up for a desert
shoot with an 8-foot long banquet table. He was using it as a shooting bench. It
was too low, too long and too heavy to suit me. But it lit a fire in me to
improve on what he had. I scrounged up a set of legs from a broken banquet table
and created something taller, lighter and sized to fit my shooting needs. The
result is similar to (but not exactly like) what you see here.
Please note that there are different styles of table legs
available and each may require some variation in mounting design. I have come
across three different styles that work well. I prefer the size found on the
smaller 24"x48" tables *. Only because they are narrower in the leg spread (side
to side).
* These smaller tables I find I can buy NEW (the whole table)
when on sale at Office Depot, Office Max and a few other discount office supply
stores for about $20. That is now my source for table legs. However, I now have
a few tabletops in the garage that I have little or no use for. (cut in half
lengthwise they make good shelves for the garage).
Current table materials:
Table (legs or table)
Top (24" X 48" sheet of 5/8" CDX plywood) (or you can use
the original table top and save money, but they are pressed board and heavy)
Clamps (to attach the legs to the table, this type of clamp
is designed to attach pipes to the studs in a house frame etc.)
Molding (a trim rail around the front area of the table to
keep thing from rolling off) (an OPTION)
Wood glue
Wood screws 1¼" long and ½" long
Additional wood for leg mounting
Leg tips (heavy duty table leg caps or crutch tips)
Dowel to extend the legs (broom handle – Home Depot).
Stain and finish. (Model table not finished yet)
** I prefer the legs shown in the photos are over the box frame
leg sets, but either is equally good for this purpose.
Assembly:
Determine the size you want/need. By trial and error I
discovered that 40" in length was about the right size for my needs. I initially
made mine to fit in the back of my SUV. Forty inches is also long enough to
place the front sandbags or rest anywhere under the stock and not have it
falling off the table. I assembled one 35" long to fit in the trunk of a
friend's small car.
To keep the weight as low as possible I started with a full
24" width and found it to be more than I needed. I trimmed it down (mainly to
reduce weight) and settled on a final width of 22". However, the legs were 24"
wide. NOTE: The smaller table leg sets (available only on the 24x48" tables) are
only about 20" wide (refer back to first paragraph).
I used a saber saw to cut two recesses at the rear of the
table top to allow shooting from either side. I did this because I often shoot
left-handed. If you never shoot left (or right) handed, you may decide to make
only one cutout. If you do this however,
remember to mark the top so the leg can be mounted in the
center. The width at the rear is about 13". This is wide enough to mount the
rear legs with a little left over on each side. This width is also adequate to
settle your elbow comfortably.
After you have your top the size and shape you want, radius
the edges with a file or router then sandpaper. Next I applied glue to the
entire edge to seal it and prevent splintering of the plywood. I then put on one
coat of clear finish. I didn’t go to any extremes to make this a beautiful
table, only functional. You can apply paint if you wish, but I suggest lighter
colors, as the darker ones will get real hot in the sun.
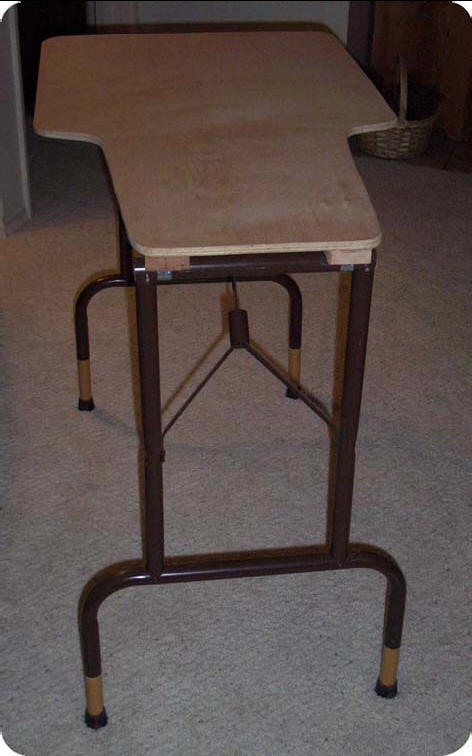
Layout the leg locations. Because of the short length of the
top, the legs will overlap one another when folded. If both legs are mounted
directly to the bottom side of the table, one set will lay flat and the other
will point skyward at a 5-10 degree angle. This is not convenient to pack in
your vehicle or to store in the garage. If that is not a problem, skip the next
section about adding blocks.
I added blocks to the bottom of the tabletop that allows the
legs to lay parallel when the table is folded. You can use one large block,
however, individual blocks (per photo) are lighter. Raising one set of legs
allows both leg sets to lay flat and parallel. On this model I used standard 1"
thick pine and it in not really 1" thick so the legs do not lay quite parallel
but close enough for me. If you want them parallel you need to make your blocks
exactly the thickness of the tubing.
Attach the block(s) of wood to the bottom side of the
tabletop with glue and the 1¼" screws. Attach the legs to the block with screws.
NOTE: install the two blocks at the end of the table first. Then install the
legs to those blocks. Make sure they are straight. With the legs folded parallel
to the surface of the top, mark the position of the support block for the
support strut. Attach the block at that location with glue and screws. Again lay
the legs parallel to the top and attach the support to the block.

Now for the fun part! The legs as they are made were too
short to suit me and I am only 5'7". I don't like sitting at the shooting bench
all hunched over feeling like some kind of contortionist. This posture is not
conducive to relaxed shooting. After a day shooting squirrels or prairie dogs
the back suffers. To make the table height comfortable I had to raise it four to
five inches.
Additionally, I like a stool that is high enough to allow my
feet to be flat on the ground with my thighs parallel to the ground. That is
about a 16" to 18" tall stool. I use a folding campstool with cloth seat. The
model I like is camo patterned and has a storage pouch below the seat.
To raise the table I added some length to each of the four
legs. The leg set mounted on the block is about one inch longer than the other
set. The idea is to extend one set of legs about 4" and the other legs about 5".

Depending on the diameter of the leg tubing you may need to
consider different leg extensions. In this case I was able to use broom handle
stock. The tubing on the set in the photos is about 1.15" outside diameter. If
the dowel is too large a diameter you can split them lengthwise with a hacksaw
for a couple inches and force them in, or you can shave them down with a block
plane, spoke shave, or even a pocketknife. If your dowel stock is too small in
diameter you may be able to wrap tape around it as a shim. I haven’t tried that,
I prefer splitting or trimming to get a good fit. Once the dowels are in place,
lock them with a screw. Drill a hole in the side of the leg and into the wood.
Insert a screw to hold the legs tight. This is just an insurance policy so you
don’t loose a leg somewhere when you aren’t looking. A three-legged table is
quite wobbly.
On a couple of tables I was able to use electrical conduit.
The next several paragraphs deal with installing conduit type leg extensions. If
you used dowel you may find some tips in this material also.
Many of the leg sets I have encountered are about one inch
outside diameter with something less than
"
inside diameter. These instructions apply to that particular size of leg tubing
(not the model here). The conduit is about 7/8" outside diameter. In this case,
the dimensional difference makes for a very tight fit. The objective is to force
the conduit into the bottom of the leg. So, two options are available, cut the
table leg vertically to allow it to expand, thus the conduit will slip inside.
Or, cut the end of the conduit vertically and compress it to fit into the leg.
DO NOT cut the table legs; DO cut the conduit (I know, I made that error once).
Cut four lengths of the electrical conduit, two 6½" long and
the other two 7½" long. Measure 1½" from one end of each section and put a piece
of masking tape around the conduit there. From that same end, cut across the
middle down to the tape. Make a second cut 90 degrees to the first. After doing
this you now have four tabs 1½" long. If you have the same trouble I have with a
hacksaw, your cuts are not straight, but that is not a critical issue here.
Next, "bell" the end of each table leg to help get the
conduit started into the leg. The metal of the legs is relatively easy to shape
with a steel bar or long screwdriver. Put the end of the bar, screwdriver of
whatever you are using, inside the leg about 2" and rotate while applying
pressure outward at the opening. The leg is now "Belled".
Now you are ready to install the leg extensions to the leg
sets. Remove the tape from the conduit. Put Press the four tabs at the end of
the conduit as tightly as possible and push the conduit into a leg. Use a hammer
and drive the conduit in until it is very tight.
Repeat the step with the other three legs. Make sure the two
shorter conduit extensions are on the leg set that is raised on the block. If
not, you will never get the table to level. Once these conduits are in place
they may be very difficult to remove, next to impossible in fact.
Measure the conduit in each leg set and make sure they extend
the same distance from the end of the original leg. The table should stand level
on a level surface. If not, adjust the leg extensions with a
tap of a hammer or trim the offending leg shorter with a
file. Done?
Now add the crutch tip. I use crutch tips here because they
are heavier duty than the average rubber or plastic table leg caps.
There are a few side effects of making this shooting bench. I
must warn you that your shooting partners may want to use yours, not theirs,
because yours is, stable and lighter than theirs. Also, you may find it quite
useful in the garage as a small convenient worktable or reloading bench. I set
mine up and clamp the rifle vice to it for cleaning or other gun work.
If you have any questions about the instructions or have
suggestions to improve this portable-shooting bench please contact me at
[email protected]
or
call me (909) 785-4986.
If you do not have the means to make one of these benches I
can be talked into doing it. To break even on this it will cost the buyer parts
and shipping + $30 labor. The current material cost (2001 prices) runs about
$55-$65. The Labor included my expense or running around town picking up the
materials, thus I usually come out only a few bucks above even.
Your comments and suggestions may make this more useful to
hundreds of others that are looking for an inexpensive, simple, light,
convenient, and portable shooting bench. And feel free to pass the instructions
along to your friend. I hold no patents or rights here.
I have received suggestions like adding a piece of half-round
molding around the top to make a small fence so things will not roll off the
top. One suggestion was to cut a hole large enough to hold a drink cup.
Since I first wrote and published this article in the
California Varmint Callers website table legs have become almost impossible to
find in my area. I used to get them through Harbor Freight, but they no longer
carry them and I have not yet found another reliable commercial source. I have
scrounged a few sets by asking at churches and schools if they had any tables
with damaged tops. However, as I state in the beginning I now just wait for the
sales and buy new tables, remove the legs and start from there.
Have a Safe Shooting Day.
For assistance, more information or if you have additional
ideas that can improve this bench, please send me a note at
[email protected]
Have a Safe Shooting Day.